


WooMobileApp – WordPress Plugin Introduction
The WooMobileApp plugin is your control panel for building and managing your store’s mobile app experience. It connects your WooCommerce site to the myWooApp Android application and handles everything from app branding to build requests—all from inside your WordPress admin.
With WooMobileApp, you can:
-
Configure your app’s name, logo, splash screen, and banners
-
Provide API access and JWT authentication for secure login
-
Check for server compatibility (e.g. ionCube, REST API availability)
-
Request your App Store or Play Store deployment
-
Update app-specific settings as your store evolves
This plugin is required in order to launch your own version of myWooApp with your store’s branding and data.
Home Screen – License Verification
When you first open WooMobileApp in your WordPress admin you’ll land on the Welcome screen.
Here you must enter the license keys that unlock your custom builds.
-
Android License – paste the key that was issued for your Android app build.
-
iOS License – paste the key that was issued for your iOS app build (leave blank if you’re launching Android only for now).
-
Click Verify License.
⚠️ Important:
• A license entered in the wrong field will trigger a build for the wrong platform. Double-check before you click Verify.
• If you don’t have a license yet, follow the “Create your license” link below the button to generate one.
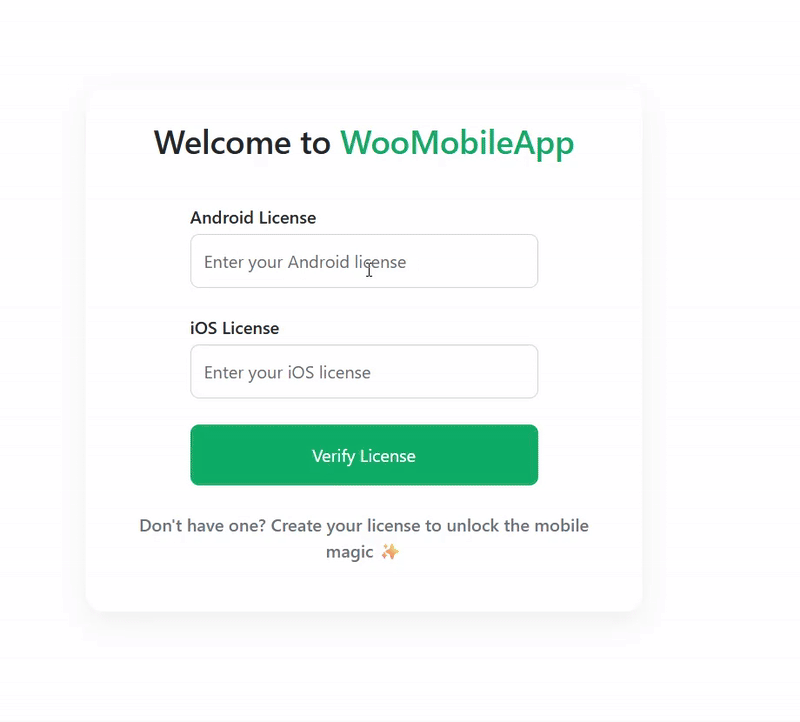
After verification succeeds, you’ll be taken to the Branding dashboard, where you can configure logos, banners, and request your first custom APK (or IPA) build.
Thanks! Here's the corrected and clarified section with that detail reflected:
API Keys
Before you can launch your custom app build, WooMobileApp needs a few credentials configured on the API Keys screen.
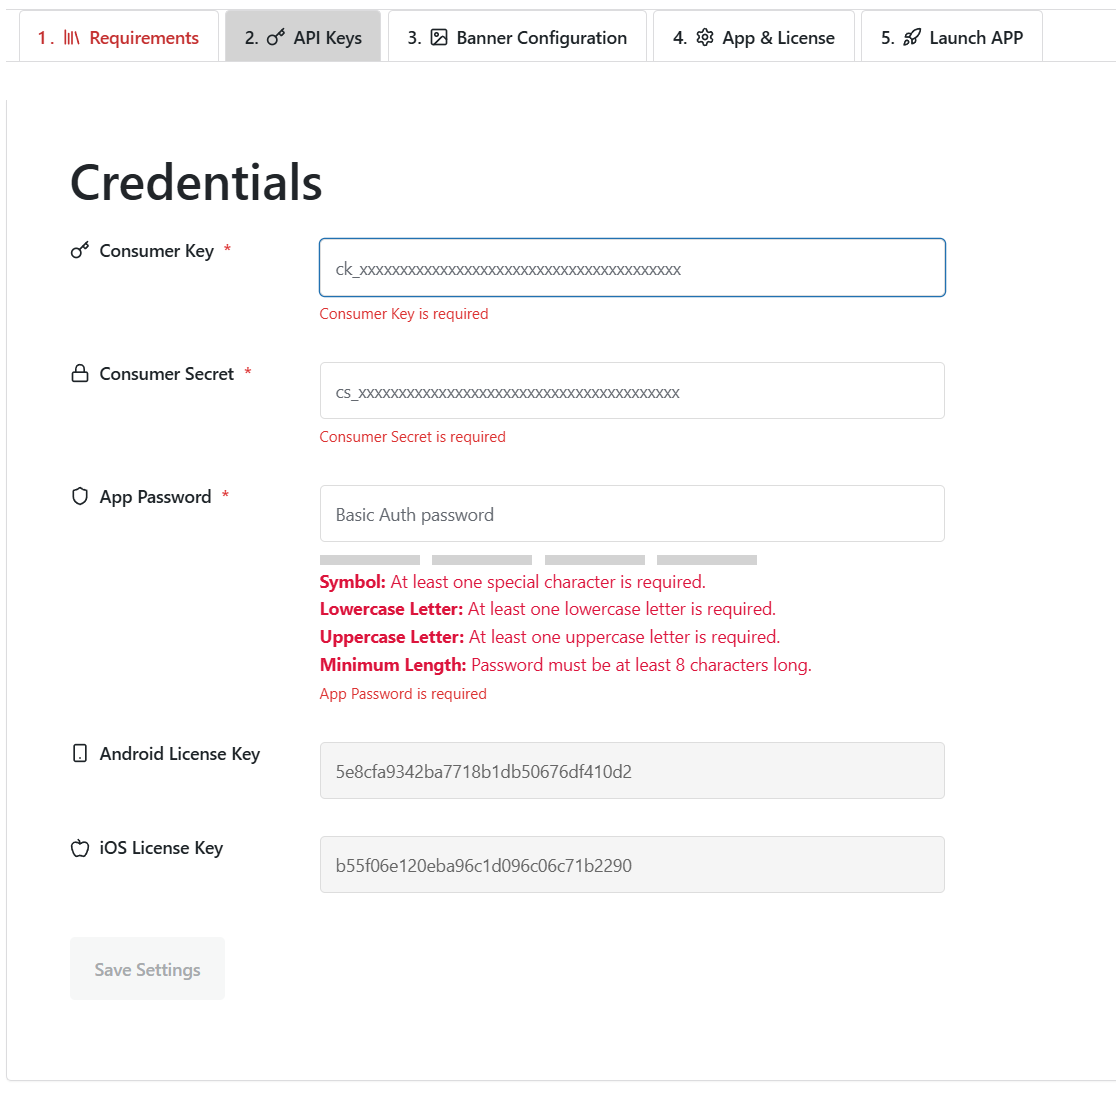
Note:
The credentials entered here are not used to pull customer or product data in the live app.
These are used internally by the plugin and during the app build process.
2.1 WooCommerce Consumer Key & Secret
These keys are used by the plugin internally to validate your WooCommerce setup & test connectivity
To generate them:
-
Go to WooCommerce → Settings → Advanced → REST API
-
Click Add Key
-
Set:
-
User: An Administrator account (required)
-
Permissions: Read/Write
-
Description: (e.g., “WooMobileApp”)
-
-
Click Generate API Key
-
Paste the generated:
-
Consumer Key (
ck_…) -
Consumer Secret (
cs_…)
into the plugin's API Keys section.
-
2.2 App Password
This is the only credential that the app itself uses, and only for a single purpose:
The App Password is used during account registration inside the app, to validate the mobile request against your site’s API.
Requirements:
-
Minimum 8 characters
-
Must include:
-
One uppercase letter
-
One lowercase letter
-
One number
-
One special character (
!@#$%, etc.)
-
For best practice, use at least 16 characters (e.g., M0bileApp!Key@2025).
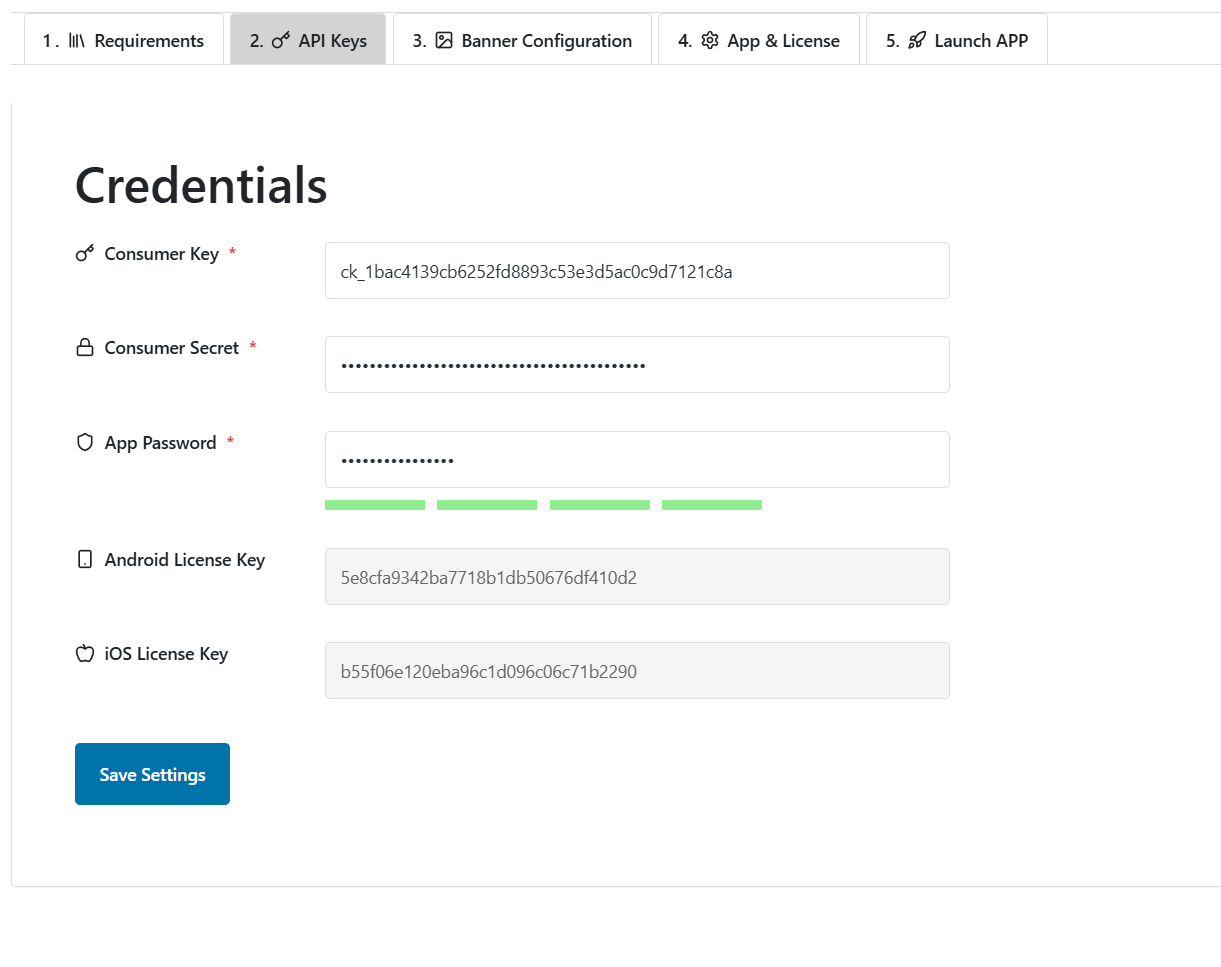
2.3 Save Settings
After entering all values, click Save Settings.
The plugin will validate the entries. If anything is missing or invalid, an error will be shown directly beneath the affected field.
Once saved, you're ready to move on to banner configuration and app branding.
Banner Configuration
The Banner Configuration tab lets you upload up to three rotating hero banners that appear at the top of the app’s Home screen.
Image Guidelines
-
Minimum: 1920 × 1080 px (Full HD)
-
Recommended: 3840 × 2160 px (QHD)
-
Premium: 5120 × 2880 px or higher
-
Ultra-wide: 3440 × 1440 px or 5120 × 2160 px
-
Format: WebP or JPEG (≤ 300 KB)
-
HiDPI: Provide 2× resolution versions for retina displays
Fields to Complete for Each Banner
-
Image
Click Select Image and upload a graphic that meets the specs above. -
Title
A short, eye-catching headline (about 20 characters or fewer). This text overlays the banner in the app. -
Description
A one-line teaser or call to action. Emojis are supported (e.g.,Mega Sale now!). -
Action
Choose what happens when the banner is tapped.⚠️ Note: Actions are currently disabled—this field is reserved for future use.
-
Categories (ID)
Required! You must assign one WooCommerce category ID to each banner.
This ID is used to filter which products are shown when the banner is tapped.
Checklist
-
Use parent category IDs only – The in-app catalog starts with top-level (parent) categories. When a shopper taps a parent, the app loads all products in that branch and then offers a filter modal so they can drill down by the nested categories underneath. Keep your category tree clean and logical (e.g., Clothing, Electronics at the top, with sub-categories like T-Shirts or Chargers nested below).
-
Stay on brand – Match your store’s color palette and tone.
-
Rotate regularly – Update banners for seasonal events or major promotions.
-
Image readability – Use high-contrast text or overlays so titles and descriptions remain visible on every device.
Best Practice
-
Use parent category IDs only – The in-app catalog starts with top-level (parent) categories. When a shopper taps a parent, the app loads all products in that branch and then offers a filter modal so they can drill down by the nested categories underneath. Keep your category tree clean and logical (e.g., Clothing, Electronics at the top, with sub-categories like T-Shirts or Chargers nested below).
-
Stay on brand – Match your store’s color palette and tone.
-
Rotate regularly – Update banners for seasonal events or major promotions.
-
Order matters – Banners rotate in the order you configure them (Banner 1 → Banner 2 → Banner 3).
-
After filling out all fields, click Save Settings. The plugin will validate image sizes and required fields; any errors will be highlighted for correction.
App & License Settings
The App & License section allows the store admin to review license validation status and control key behaviors of the mobile app integration.
License Verification Status
At the top of this screen, you'll see:
-
The status of both your Android and iOS licenses (verified or missing)
-
The next scheduled check (runs every 24 hours automatically)
-
A manual check button to instantly re-verify licenses on demand
If a license becomes invalid or expired, the plugin will restrict app functionality until it’s resolved.
WooCommerce API Endpoint Health
This section checks whether your app can access critical WooCommerce API endpoints:
-
Products
-
Orders
-
Customers
If any of these fail, the plugin will alert you to potential configuration issues (e.g. missing API keys, disabled endpoints).
⚠️ Danger Zone – App Controls
The Danger Zone lets you control or restrict app behavior at runtime:
-
App ON/OFF
If turned off, the app will no longer connect to your API. This disables all data sync. -
User Registration
Enable or disable account creation from within the app. -
Password Reset
Allow or prevent users from resetting their password through the app’s “Forgot Password” feature.
These switches provide flexibility without requiring you to uninstall or reconfigure the entire plugin.
Clear Data – License Reset
Clicking Clear All License Keys will:
-
Remove both Android and iOS license keys from your WordPress
-
Redirect you to the initial Home screen to enter a new set of licenses
⚠️ This action is permanent and cannot be undone.
Use this only if you're switching to a new license or republishing under a different app identity.
Launch App
The Launch App tab is the final step before you request your custom build.
Auto-generated fields
When you open this screen the plugin pre-fills every text box—package name, API URLs, token URL, checkout URL, and supported gateways—based on your WordPress and WooCommerce settings. These values already match WooCommerce’s default configuration and will work out of the box for nearly every store. We recommend keeping these defaults unless you have an advanced setup (for example, a reverse proxy or a custom permalink structure) that truly requires manual edits.
Key fields you’ll see:
-
Name – your unique Android package ID (
com.example.myapp) must be provide manually. -
Site URL – the public URL of your store.
-
REST API URL / WooCommerce API URL / Auth Token URL – auto-detected endpoints.
-
Order Pay URL – the URL used when the checkout WebView opens.
-
Supported Gateways – a comma-separated list of payment gateway IDs to preload in the app.
Branding images
Below the text fields you’ll upload four graphics:
-
App Icon – shown on the device home screen and Play Store.
-
Splash Icon (White-mode) – centered on the launch screen when the device is in light mode.
-
Splash Icon (Dark-mode) – variant shown if the device theme is dark.
-
Site Logo – used inside the app header and certain fallback screens.
Sizing rules
• App Icon & both Splash Icons: 1024 × 1024 px, PNG with transparent background.
• Site Logo: 1920 × 1080 px, PNG or SVG for crisp rendering on large screens.
Tip: keep icons under 2 Mb each to minimize the app bundle size.
Finishing up
-
Click Save App Config to store info.
-
Click Generate App Export to create a build-ready package (APK request for Android, IPA request for iOS if licensed).
The export contains your branding assets, API endpoints, and settings—ready for our build server to compile your fully branded version of myWooApp.


